In this article, we are going to learn how to add an author box in GeneratePress Theme. I am going to cover both how to add an author box without any plugin and also How to add an author box using a plugin.
If you are using the GeneratePress theme on your website and trying to find how to add an author box below your articles and pages. You have arrived at the best website for that.
This article will not just cover how to add an author box in GeneratePress Theme. I am also telling you how to add an Author box in different styles to make them more attractive.
Note: I have shared custom CSS code for three different styles so make sure you read this article till the end to choose your desired design for your author box.
Are you excited to know more about it?
In this article, you will learn
- Why you need an author box on your website
- How to add author box in GeneratePress theme free version
- How to add an author box in the GeneratePress theme without a plugin
- How to add an author box using a plugin
In the GeneratePress theme, there is no default option to add the author box but you can add the author box using the hook method and CSS code or by using some plugins.
If you are using the Premium version of the GeneratePress theme there is no need to use any plugin to add an author box but on the other hand, if you are using the free version of the Generatepress theme then you need a plugin to add an author box.
But don’t worry I will tell you both how to add the author box in the free version of the GeneratePress theme or the premium version of the GeneratePress theme.
Why you need an author box on your website
The author box makes your website professional and it helps blog readers to know about the person behind the article that they are reading.
As we all know, an authority website gets a higher ranking in SERP than any other website that doesn’t have authority.
The main reason behind using an author box on websites is the E-A-T signal.
E-A-T means Expertise, Authority, and Trust. E-A-T is a search engine guideline used by Google to improve search results quality.
The author box is not a direct ranking factor but it shows Google’s expertise of the author who is writing the blog post on your website. And it’s a positive signal toward E-A-T.
Read more about E-A-T on Ahrefs blog post What is E-A-T and why it’s important for SEO?
Moreover, the author box helps to create a personal connection between the blog reader and the author. With the help of the author, the box reader knows about the person behind the blog post/website.
Before adding an author box to your website
Before adding an author box to your website you need to know about Gravatar and Biographical Info.
Gravatar
Gravatar is known as a Globally Recognized Avatar. It is a part of WordPress which is maintained and supported by Automattic.
Using the Gravatar site you can create your profile by just signing up and uploading the photos. And Gravatar can be enabled on any WordPress site automatically.
How to Enable Gravatar in WordPress?
You need to create an account on the Gravatar website to complete your profile.

- Go to your WordPress Dashboard.
- Visit the Users Menu.
- Edit your User Profile.
- Go to the About Yourself section > Profile Picture.
- Now Click on You can change your profile picture on Gravatar.
- You will be redirected to the Gravatar website.
- Sign in/sign up using WordPress.com credentials.
- Authorize your WordPress account with Gravatar.
- Now go to the Add a New Image section.
- Upload your picture.
- Rate your Gravatar between G, PG, R, and X.
- You’re done with the Gravatar profile.
- Go back to the About Yourself section and you will be able to see your Profile Picture.
The profile picture appears while commenting on WordPress sites, Author Bio, and WordPress forums. This one picture works for all your profiles.
Biographical Info
After working on Gravatar in the About Yourself section, you need to write the Author Bio. It will appear on your site along with the profile picture that you added to the Gravatar website. You can also link up your Social Media Profile using Anchor Tag in the Biography Section.

In certain cases, both Gravatar and Bio are used by WordPress websites. In some cases, the Author Bio Plugin helps to implement both Avatar and Author info.
How to add author box in GeneratePress theme Free Version
In the free GeneratePress theme, you need to install a plugin to add an author box to your website.
There are many author box plugins available to add an author box to your websites Some of them are mentioned below that I used and recommend to all of you. Some of them are recommended in the GeneratePress forum as well.
- Simple Author Box

Simple Author Box is one of the best plugins to add an author box to your website. As stated in the name, the plugin is very simple to implement, and where you can get the best out of the plugin. I have tried this plugin on one of my sites and I am quite happy with this plugin. It displays the author’s name, author gravatar & description along with the social icons. It can be customized to match your theme design.
Moreover, the plugin is responsive and fully customizable to match your theme design. Also, you can add up to 30 social media profiles to your Author Bio Box.
- Fancier Author Box
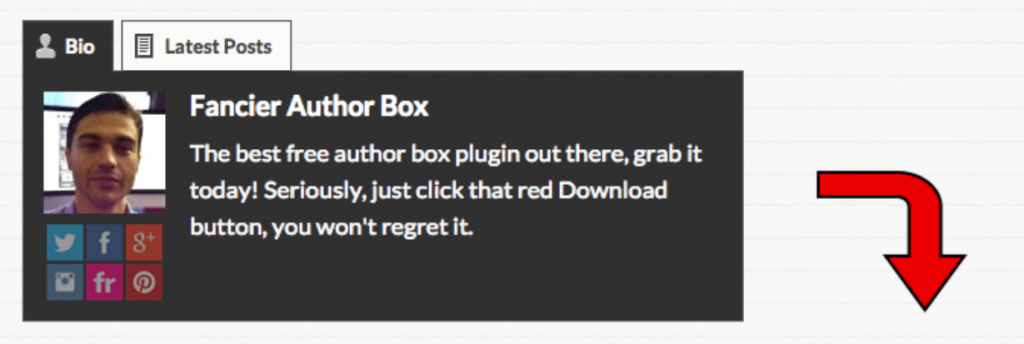
Fancier Author Box by ThematoSoup is a great plugin to look after if you are interested in integrating Author Bio into every post on your website or blog.
The plugin has an active installation of over 10,000 with 4.8 average ratings out of 5 stars. But the bad thing about this plugin is, that it hasn’t been updated over the last 5 years. So be aware of compatibility issues.
- Starbox

(Starbox) When GeneratePress clients are asking about Author Box, the customer support team recommends the Starbox Author plugin. So, you can try the Starbox plugin in GeneratePress Theme if you are using the free version.
Starbox plugin supports Google Microformats vCard, customization of the author info for each Author, Social Media profile link for each Author, using your own Avatar rather than using Gravatar, etc.
- Molongui Author Box, Guest Authors & Co-Authors

Molongui author box is an excellent extension that has extensive customization preferences to create a responsive Author bio-design. It has different layouts and flexible display options to choose from. Till now, this plugin has 4000+ installations.
If you want to avoid the use of the above-listed plugins on your website to add an author box then you need to activate the Element Module to use the Hook method. However, the Element module is only available on the Premium version of the GeneratePress theme.
So, to get the author box without a plugin first get the Premium version of the GeneratePress theme from the below button
After getting the premium version follow the below method.
How to add author box in GeneratePress theme Premium Version
In the free version of the GeneratePress theme, we use plugins to add the author box on our website but if you are using the premium version there is no need to use any plugins.
How to add an author box in the GeneratePress theme without a plugin?
To add the author box in the premium version of the GeneratePress theme I am going to use the hook method. i.e. without the use of the Author Box plugin. You need to do the following things.
Let’s dive into it,
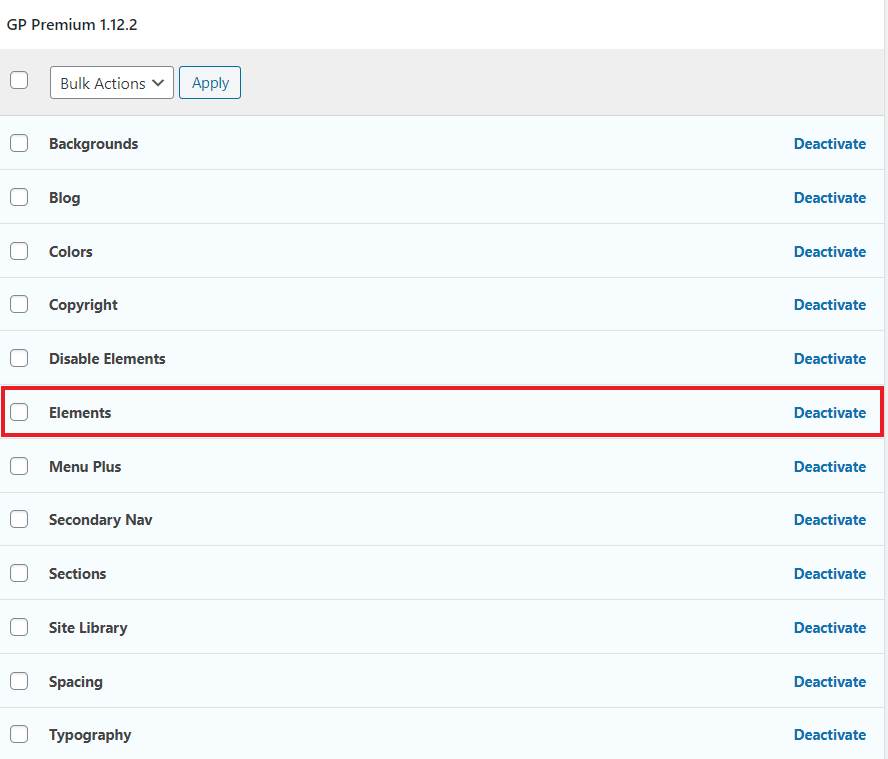
Step 1. Active The Element Module
The First step is to activate the element module of the GeneratePress premium theme.
To do this Go to Appearance > GeneratePress > Elements > Activate
Step 2. Add New Element Hook
Now you need to add a new hook element in the GeneratePress Premium Theme. To do this Go To Appearance > Elements > Add New Elements
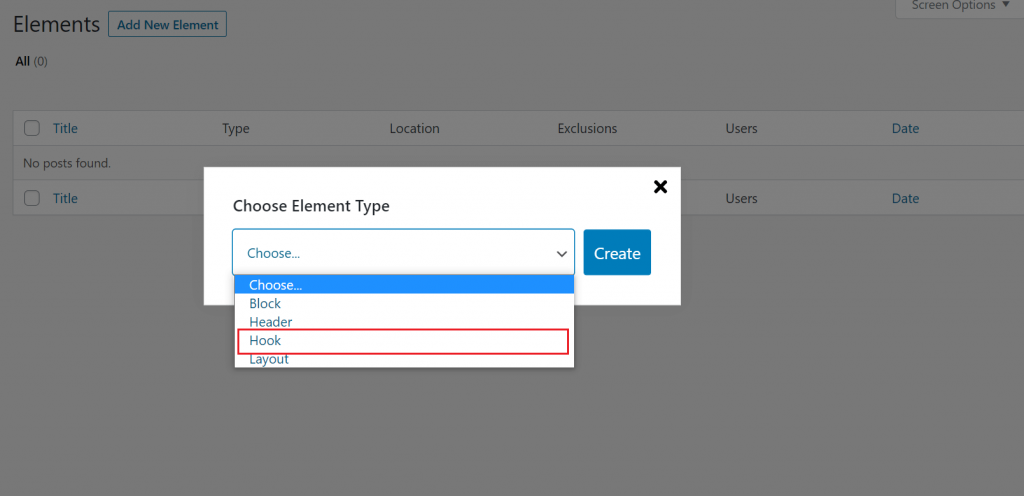
Choose the Element Type as Hook. Give the Hook a New Title “Author Box“. Copy and Paste the following Code
Note: Here I am posting Many different codes, use only one of them.
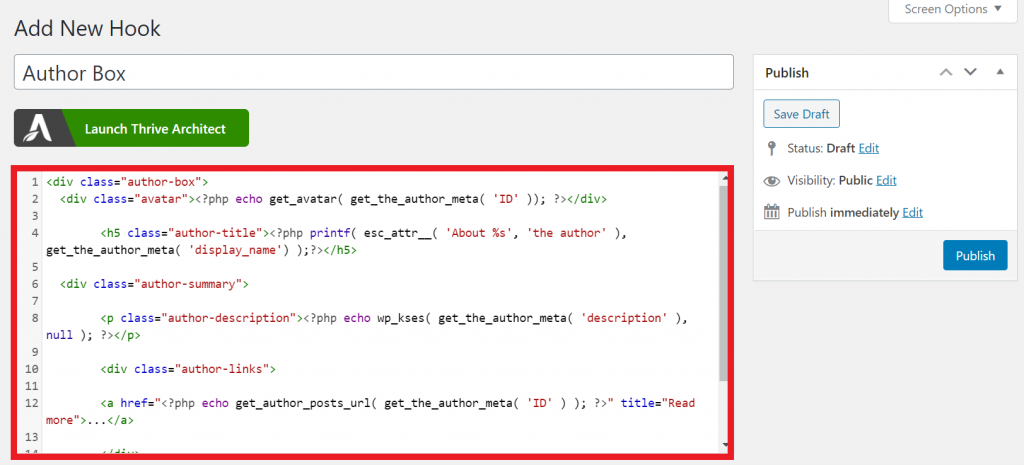
Hook Code 1

<div class="author-box">
    <div class="avatar">
        <?php echo get_avatar( get_the_author_meta( 'ID' ), 250 ); ?>
    </div>
    <div class="author-info">
        <h5 class="author-title" itemprop="author" itemscope itemtype="http://schema.org/Person">
            <span itemprop="name"><?php printf( get_the_author_meta( 'display_name') );?></span>
        </h5>
        <div class="author-summary">
            <p class="author-description"><?php echo wp_kses( get_the_author_meta( 'description' ), null ); ?></p></div>
<div class="author-links">
            <a href="<?php echo get_author_posts_url( get_the_author_meta( 'ID' ) ); ?>" title="Read more">...</a>
       </div>
    </div>
</div>
Hook Code 2

<div class="author-box">
	<div class="avatar"><?php echo get_avatar( get_the_author_meta( 'ID' )); ?></div>

        <h5 class="author-title"><?php printf( esc_attr__( 'About %s', 'the author' ), get_the_author_meta( 'display_name') );?></h5>

	<div class="author-summary">

        <p class="author-description"><?php echo wp_kses( get_the_author_meta( 'description' ), null ); ?></p>

        <div class="author-links">

        <a href="<?php echo get_author_posts_url( get_the_author_meta( 'ID' ) ); ?>" title="Read more">...</a>

        </div>

    </div>

</div>
Hook Code 3
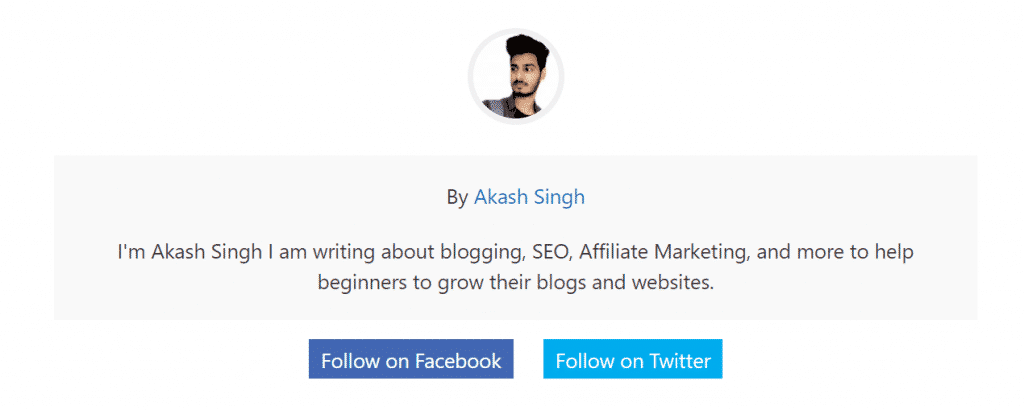
<div class="author-box">
<div class="author-box-avatar">
<?php echo get_avatar( get_the_author_meta('user_email'), '70', '' ); ?>
</div>
<div class="author-box-description">
<h5><span class="author-box-by">by</span> <?php the_author_link(); ?></h5>
<?php the_author_meta('description'); ?>
</div>
<div class="author-box-social">
<a class="facebook-author" title="Follow on Facebook" href="https://facebook.com/beakkisingh" target="_blank">Follow on Facebook</a>
<a class="twitter-author" title="Follow on Twitter" href="https://twitter.com/inakashsingh" target="_blank">Follow on Twitter</a>
</div>
</div>
Hook Code 4

<div class="author-box">
<div class="author-box-avatar">
<?php echo get_avatar( get_the_author_meta('user_email'), '70', '' ); ?>
</div>
<div class="author-box-description">
<h5><span class="author-box-by">by</span> <?php the_author_link(); ?></h5>
<?php the_author_meta('description'); ?>
</div>
</div>
Hook Code 5

<div class="author-box">
<div class="author-box-avatar">
<?php echo get_avatar( get_the_author_meta('user_email'), '130', '' ); ?>
</div>
<div class="author-box-description">
<h5><span class="author-box-by">by</span> <?php the_author_link(); ?></h5>
<?php the_author_meta('description'); ?>
</div>
</div>
Go to Hook Settings and choose Hook to show after_content. Check the Execute PHP box. Assign the Priority to 20.

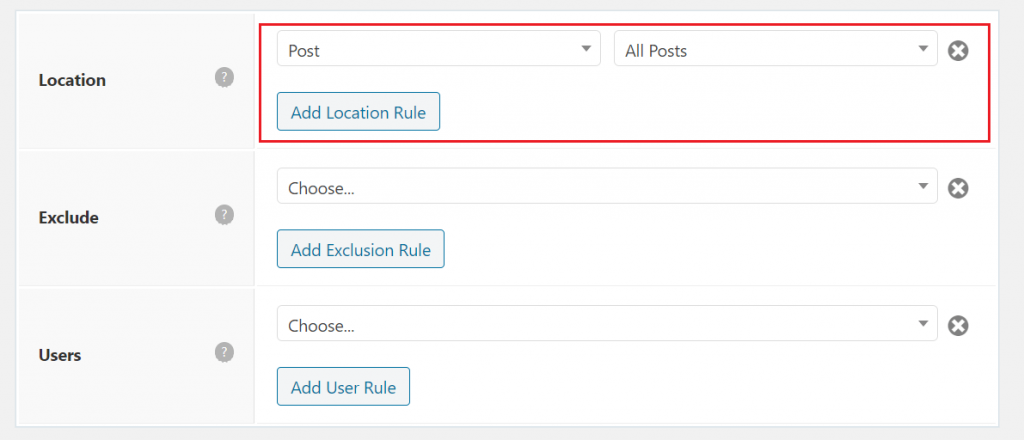
Again, Go to Display Rules and Choose the Location to display in Post > All Posts.
And Finally, Hit the Publish button.
Step 3. Add CSS code to style author box
This will make your author box more amazing and attractive. Style the Author Box with CSS Code. You can change or tweak these codes as necessary for your blog. The CSS code works both for desktop, tablet, and mobile devices.
Now go to appearance>> Customize>>Additional CSS and paste the below code to style your author box.
CSS Code For Hook 1
.author-box {
	padding: 3%;
	padding-bottom: 10px;
	margin-top: 30px;
	font-size: 0.9em;
	background-color: #fff;
	display: -webkit-box;
	display: -ms-flexbox;
	display: flex;
	-webkit-box-align: center;
	-ms-flex-align: center;
	align-items: center;
        box-shadow: 0 9px 28px rgba(0,0,0,0.30), 0 15px 12px rgba(0,0,0,0.22);
}
.author-box .avatar {
	width: 250px;
	height: auto;
	border-radius: 100%;
	margin-right: 30px;
}
h5.author-title {
	margin-bottom: 0.1em;
	font-weight: 600;
}
.author-description {
	line-height: 1.6em
}
.author-links a {
	margin-top: -1.5em;
	font-size: 2em;
	line-height: 2em;
	float: left;
}
@media (max-width: 768px) {
	.author-box {
		padding: 20px;
		padding-bottom: 25px;
		margin-top: 60px;
		flex-direction: column;
		text-align: center;
	}
	.author-box .avatar {
		margin-right: 0;
		width: 100%;
		margin-top: -25px;
	}
	.author-box .avatar img {
		max-width: 100px;
	}
	.author-links a {
		float: none;
		align-self: center;
	}
	.author-description {
		margin-bottom: -0.1em;
	}
}
CSS Code For Hook 2
.author-box {
    display: -webkit-box;
    display: -ms-flexbox;
    display: flex;
    -ms-flex-wrap: wrap;
    flex-wrap: wrap;
    padding: 4%;
    margin-top: 30px;
    font-size: 1em;
    box-shadow: 0 9px 28px rgba(0,0,0,0.30), 0 15px 12px rgba(0,0,0,0.22);
}

.author-links a {
    font-size: 3em;
    line-height: 0.5em;
    float: right;
}

.author-box .avatar {
    width: 30px;
    border-radius: 100%;
    margin-right: 20px;
}

.author-title {
   font-weight: 700;
}

h4.author-title {
    margin-bottom: 0.5em;
}

.author-description {
	margin-bottom: 10px;
}

/* For Mobile Devices */
@media (max-width: 768px) {
    .author-box {
        flex-direction: column;
        text-align: center;
	padding: 50px 10px;
    }

    .author-box .avatar {
        margin-right: 0;
        margin-bottom: 10px;
        width: 100%;
	margin-top: -35px;
    }

    .author-box .avatar img {
        max-width: 70px;
    }
}
CSS Code for Hook 3
.author-box{
    background: #ffffff;
    padding: 40px;
    text-align:center;
}
.author-box-avatar img{
    border-radius:100%;
    border:5px solid #f1f1f1;
}

.author-box-description{
    background: #f9f9f9;
    padding: 20px;
    margin: 20px;
}
.author-box-description h5{
    text-transform: capitalize;
}
.facebook-author, .twitter-author{
    padding: 5px 10px;
    margin: 0 10px;
    color:#ffffff!important;
}
.facebook-author{
    background-color:#4267b2;
}
.twitter-author{
    background-color:#00acee;
}
CSS Code For Hook 4
.author-box{
    background: #ffffff;
    padding: 40px;
    text-align:center;
}
.author-box-avatar img{
    border-radius:100%;
    border:5px solid #f1f1f1;
}

.author-box-description{
    background: #f9f9f9;
    padding: 20px;
    margin: 20px;
}
.author-box-description h5{
    text-transform: capitalize;
}
.facebook-author, .twitter-author{
    padding: 5px 10px;
    margin: 0 10px;
    color:#ffffff!important;
}
CSS Code For Hook 5
.author-box{
    background: #ffffff;
    padding: 40px;
    overflow:hidden;
}
.author-box-avatar{
    float: left;
    margin: 0 20px 0 0;
}
.author-box-avatar img{
    border-radius:100%;
    border:5px solid #f1f1f1;
}
.author-box-description h5{
    font-size: 24px;
    margin-bottom: 10px;
    font-weight: bold;
    text-transform: capitalize;
}
How to add author box in GeneratePress theme video tutorial in Hindi
Some of our must-read articles:
Summary
This is it from my side By the above methods, you can add an author box in the free and premium versions of the GeneratePress theme.
For the free version, you need to install the author box plugin and if you are using the premium version of the GeneratePress theme then I suggest going without the plugin (Use the hook method) to add the author box.
Hey Akash,
is there another option to create an author box without coding? premium and free tool plugins are available.
Hey Akash,
In which I get lots of information. Thanks for your coding. basically, I don’t have coding knowledge it would be really useful for me.
Greet information thank you