WhatsApp is one of the most widely used instant messaging platforms in the world. According to the data currently, WhatsApp has 2.78 billion monthly active users and by adding a WhatsApp chat button in Blogger you can benefit from this huge user base.
So in this article, I will share a step-by-step tutorial about How to add a WhatsApp chat button in Blogger for free.
But wait before moving ahead let me tell you about the benefits of adding a WhatsApp chat button on your website. Whether you should use the WhatsApp chat button on your website or not.
Because WhatsApp has a huge use base you can take advantage of that by adding the WhatsApp chat button on your website. By adding this your website users can easily get in touch with you instantly in a single click. WhatsApp is the way better way to connect instead of email.
Now you know the benefit of adding a WhatsApp chat button on your website. So let’s move forward and see how to do that?
If you want to start a WordPress blog then you can check out our step-by-step guide to start a blog.
If you already have a WordPress blog and want you add a WhatsApp chat button to your WordPress blog then check out our step-by-step guide.
Steps to add a WhatsApp chat button in Blogger
To add a WhatsApp chat button to your Blogger website just follow the below steps one by one.
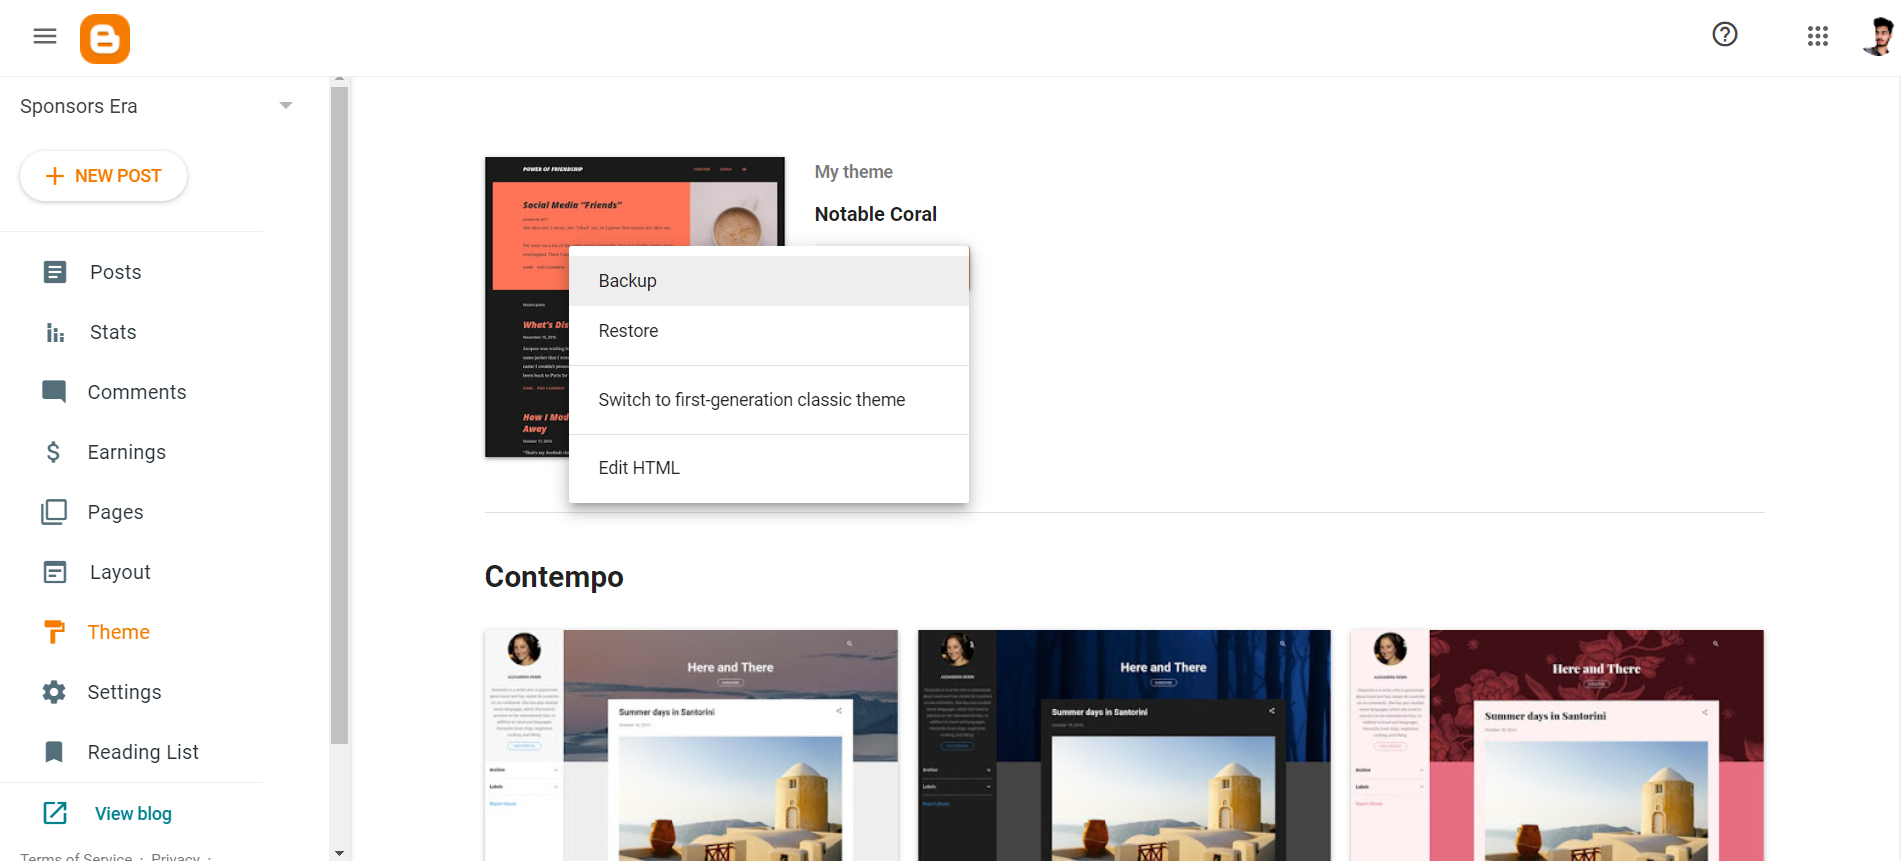
Steps 1: Log in to the blogger dashboard and go to the theme section
Step 2: Now click on the edit HTML option of your theme

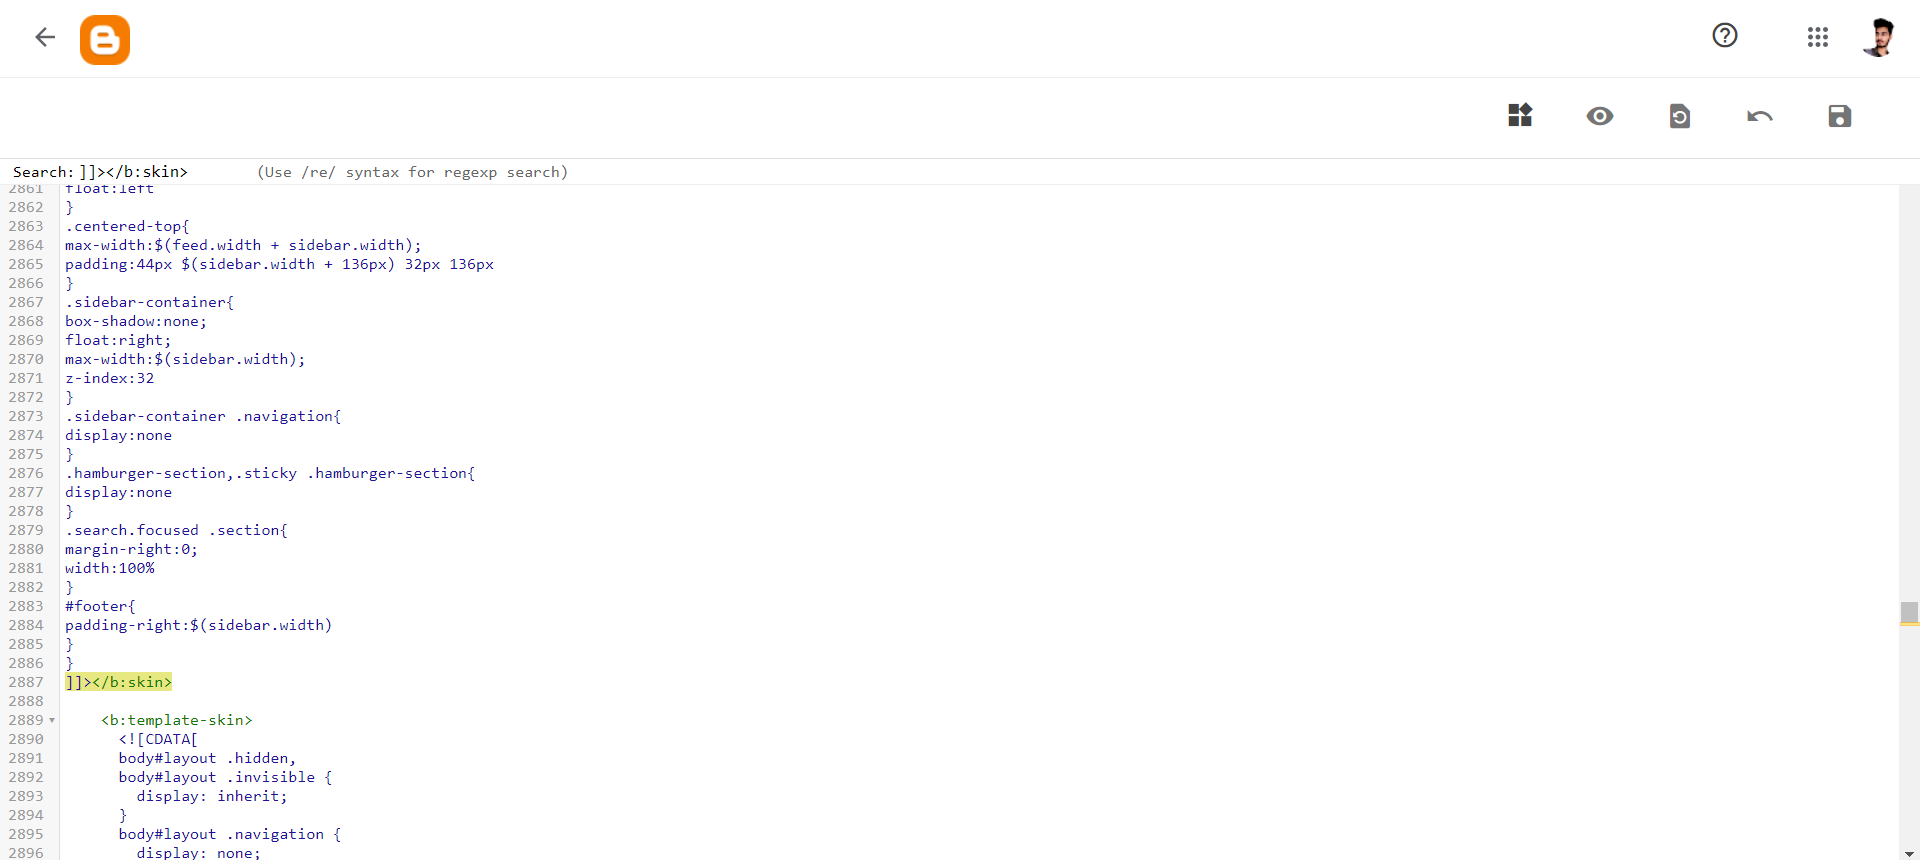
Step 3: Now search for the ]]></b:skin> tag or </style> in the theme code and paste the given CSS code just about it.
/* Chatbox Whatsapp */
:root {
--warna-background: #4dc247;
--warna-bg-chat: #f0f5fb;
--warna-icon: #fff;
--warna-text: #505050;
--warna-text-alt: #989b9f;
--lebar-chatbox: 320px;
}

svg{width: 22px;height: 22px;vertical-align: middle;fill: var(--warna-icon)}
.chatMenu, .chatButton .svg-2{display: none}

.chatButton{position: fixed;background-color: var(--warna-background);bottom: 20px;left: 20px;border-radius: 50px;z-index: 20;overflow: hidden;display: flex;align-items: center;justify-content: center;width: 50px;height: 50px;-webkit-transition: all .2s ease-out;transition: all .2s ease-out}
.chatButton svg{margin: auto;fill: var(--warna-icon)}

.chatBox{position: fixed;bottom: 70px;left: 20px;width: var(--lebar-chatbox);-webkit-transition: all .2s ease-out;transition: all .2s ease-out;z-index: 21;opacity: 0;visibility: hidden;line-height: normal}
.chatContent{border-radius: 15px;background-color: #fff;box-shadow: 0 5px 15px 0 rgba(0,0,0,.05);overflow: hidden; border: 1px solid #b6b6b6;}
.chatHeader{position: relative;display: flex;align-items: center;padding: 15px 20px;background-color: var(--warna-background);overflow: hidden}
.chatHeader svg{width: 32px;height: 32px;flex-shrink: 0;fill: var(--warna-icon)}
.chatHeader .chatTitle{padding-left: 15px;font-size: 14px;color: var(--warna-icon)}
.chatHeader .chatTitle span{font-size: 11.5px;display: block;line-height: 1.58em}

.chatText{display: flex;flex-wrap: wrap;margin: 25px 20px;font-size: 12px;color: var(--warna-text)}
.chatText span{display: inline-block;margin-right: auto;padding: 10px 10px 10px 20px;background-color: var(--warna-bg-chat);border-radius: 3px 15px 15px}
.chatText span:after{content: 'Just now';margin-left: 15px;font-size: 9px;color: var(--warna-text-alt)}
.chatText .typing{margin: 15px 0 0 auto;padding: 10px 20px 10px 10px;border-radius: 15px 3px 15px 15px}
.chatText .typing: after{display: none}

.chatStart{display: flex;align-items: center;margin-top: 15px;padding: 18px 20px;border-radius: 10px;background-color: #fff;overflow: hidden;font-size: 12px;color: var(--warna-text); border: 1px solid grey;}
.chatMenu:checked + .chatButton{-webkit-transform: rotate(360deg);transform: rotate(360deg)}
.chatMenu:checked + .chatButton .svg-1{display: none}
.chatMenu:checked + .chatButton .svg-2{display: block}
.chatMenu:checked ~ .chatBox{bottom: 90px;opacity: 1;visibility: visible}
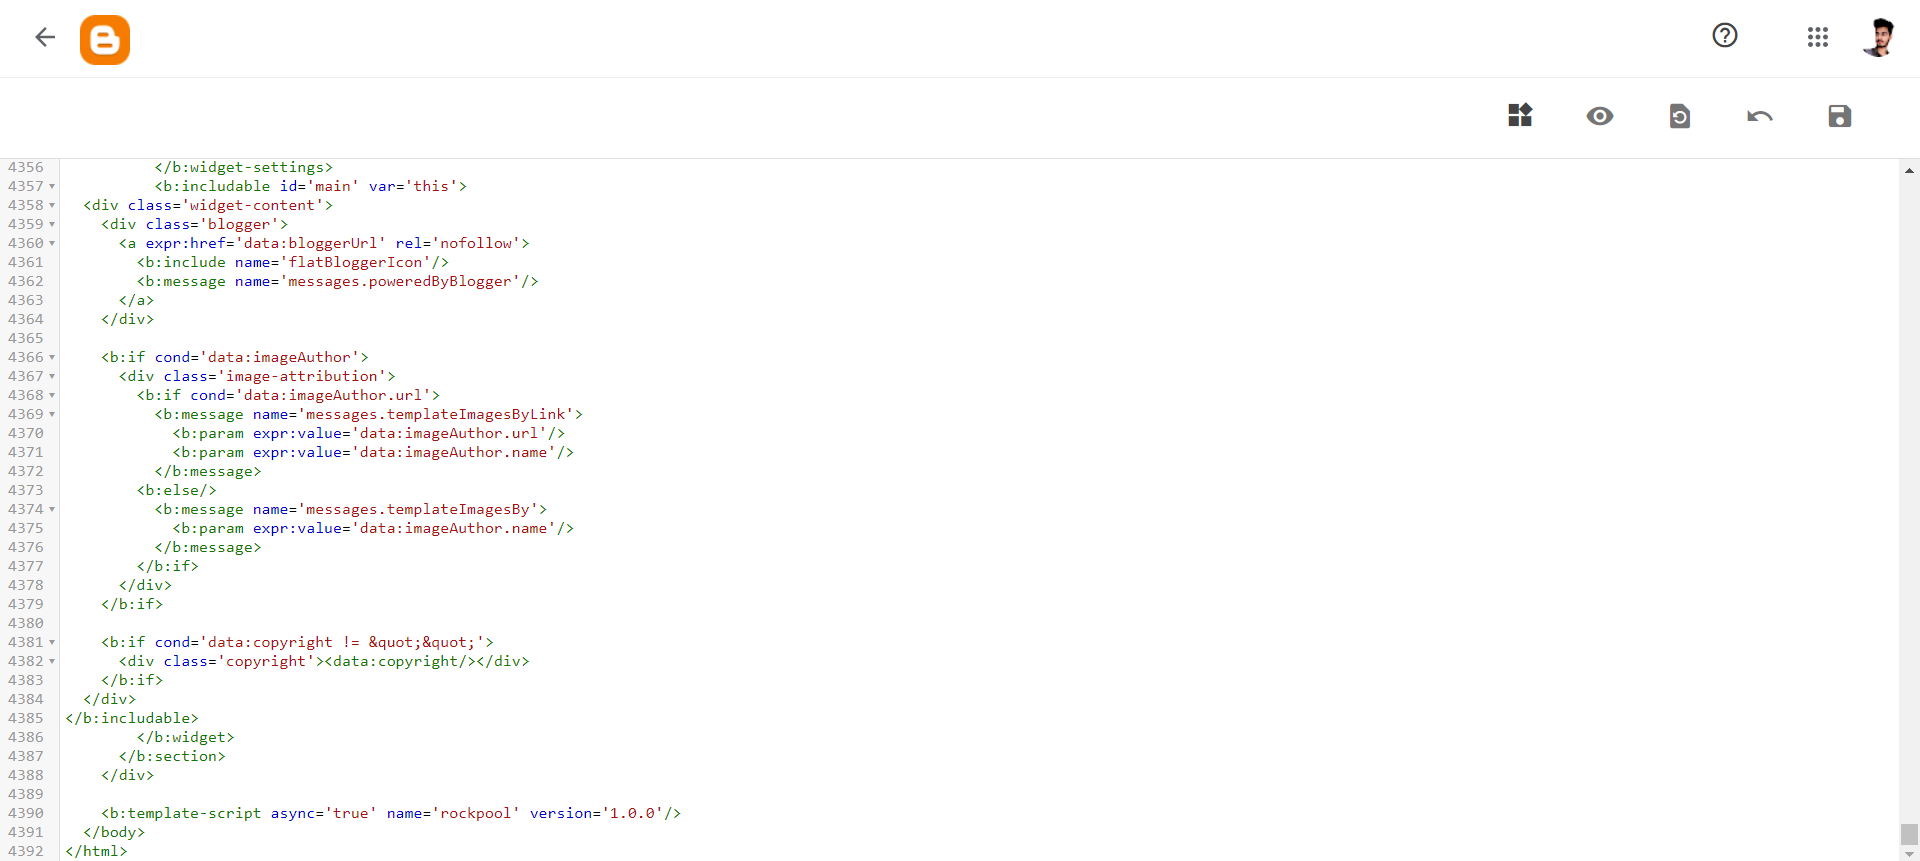
Step 4: Now search for the </body> tag and paste the given HTML code just above it.
<input class='chatMenu hidden' id='offchatMenu' type='checkbox'/>
<label class='chatButton' for='offchatMenu'>
<svg class='svg-1' viewBox='0 0 32 32'><g><path d='M16,2A13,13,0,0,0,8,25.23V29a1,1,0,0,0,.51.87A1,1,0,0,0,9,30a1,1,0,0,0,.51-.14l3.65-2.19A12.64,12.64,0,0,0,16,28,13,13,0,0,0,16,2Zm0,24a11.13,11.13,0,0,1-2.76-.36,1,1,0,0,0-.76.11L10,27.23v-2.5a1,1,0,0,0-.42-.81A11,11,0,1,1,16,26Z'/><path d='M19.86,15.18a1.9,1.9,0,0,0-2.64,0l-.09.09-1.4-1.4.09-.09a1.86,1.86,0,0,0,0-2.64L14.23,9.55a1.9,1.9,0,0,0-2.64,0l-.8.79a3.56,3.56,0,0,0-.5,3.76,10.64,10.64,0,0,0,2.62,4A8.7,8.7,0,0,0,18.56,21a2.92,2.92,0,0,0,2.1-.79l.79-.8a1.86,1.86,0,0,0,0-2.64Zm-.62,3.61c-.57.58-2.78,0-4.92-2.11a8.88,8.88,0,0,1-2.13-3.21c-.26-.79-.25-1.44,0-1.71l.7-.7,1.4,1.4-.7.7a1,1,0,0,0,0,1.41l2.82,2.82a1,1,0,0,0,1.41,0l.7-.7,1.4,1.4Z'/></g></svg>
<svg class='svg-2' viewBox='0 0 512 512'><path d='M278.6 256l68.2-68.2c6.2-6.2 6.2-16.4 0-22.6-6.2-6.2-16.4-6.2-22.6 0L256 233.4l-68.2-68.2c-6.2-6.2-16.4-6.2-22.6 0-3.1 3.1-4.7 7.2-4.7 11.3 0 4.1 1.6 8.2 4.7 11.3l68.2 68.2-68.2 68.2c-3.1 3.1-4.7 7.2-4.7 11.3 0 4.1 1.6 8.2 4.7 11.3 6.2 6.2 16.4 6.2 22.6 0l68.2-68.2 68.2 68.2c6.2 6.2 16.4 6.2 22.6 0 6.2-6.2 6.2-16.4 0-22.6L278.6 256z'/></svg>
</label>
<div class='chatBox'>
<div class='chatContent'>
<div class='chatHeader'>
<svg viewbox='0 0 32 32'><path d='M24,22a1,1,0,0,1-.64-.23L18.84,18H17A8,8,0,0,1,17,2h6a8,8,0,0,1,2,15.74V21a1,1,0,0,1-.58.91A1,1,0,0,1,24,22ZM17,4a6,6,0,0,0,0,12h2.2a1,1,0,0,1,.64.23L23,18.86V16.92a1,1,0,0,1,.86-1A6,6,0,0,0,23,4Z'/><rect height='2' width='2' x='19' y='9'/><rect height='2' width='2' x='14' y='9'/><rect height='2' width='2' x='24' y='9'/><path d='M8,30a1,1,0,0,1-.42-.09A1,1,0,0,1,7,29V25.74a8,8,0,0,1-1.28-15,1,1,0,1,1,.82,1.82,6,6,0,0,0,1.6,11.4,1,1,0,0,1,.86,1v1.94l3.16-2.63A1,1,0,0,1,12.8,24H15a5.94,5.94,0,0,0,4.29-1.82,1,1,0,0,1,1.44,1.4A8,8,0,0,1,15,26H13.16L8.64,29.77A1,1,0,0,1,8,30Z'/></svg>
<div class='chatTitle'>Do you have any doubts? <span>chat with us on WhatsApp</span></div>
</div>
<div class='chatText'>
<span>Hello, How can I help you?</span>
<span class='typing'>...</span>
</div>
</div>
<a class='chatStart' href='https://api.whatsapp.com/send?phone=987654321&text=Hello Akash Singh, I need your help' rel='nofollow noreferrer' target='_blank'>
<span>Click me to start the chat...</span>
</a>
</div>
Step 5: Change the WhatsApp number and Predefined message from the code and save the code. (Now the WhatsApp chat button will be added to your website.
How to customize the WhatsApp chat button widget?
Now you added the WhatsApp chat button Widget to your website it’s time to customize the widget. You can easily change the widget color, Logo, Size, etc.
Here the chat button is placed 20px from the left side and if want to change it to the right side you have to change the position in the CSS code.
Here you have to change the two values for the chat button (.chatButton) and (.chatBox). Here you have to change the code from left:20px to right:20px)
No to change the WhatsApp icon you have to change the SVG image URL in the HTML code.
Similarly, you can change the color and size by changing the code.
Conclusion: How to Add WhatsApp Chat Button in Blogger For Free
Now you know everything about adding the WhatsApp chat button in Blogger. If you still have any questions you can ask them in the comment section and if you find this article useful don’t forget to share it on social media to help others who want to add a WhatsApp chat button to their websites.
You can also join our premium Facebook group for free where you can connect with other like-minded bloggers. Also to get updates about our latest blog post follow us on Twitter.